# 权限控制
本系统权限控制采用 RBAC思想。简单地说,一个用户拥有若干角色,每一个角色拥有若干个菜单,菜单中存在菜单权限与按钮权限, 这样,就构造成“用户-角色-菜单” 的授权模型。在这种模型中,用户与角色、角色与菜单之间构成了多对多的关系,如下图
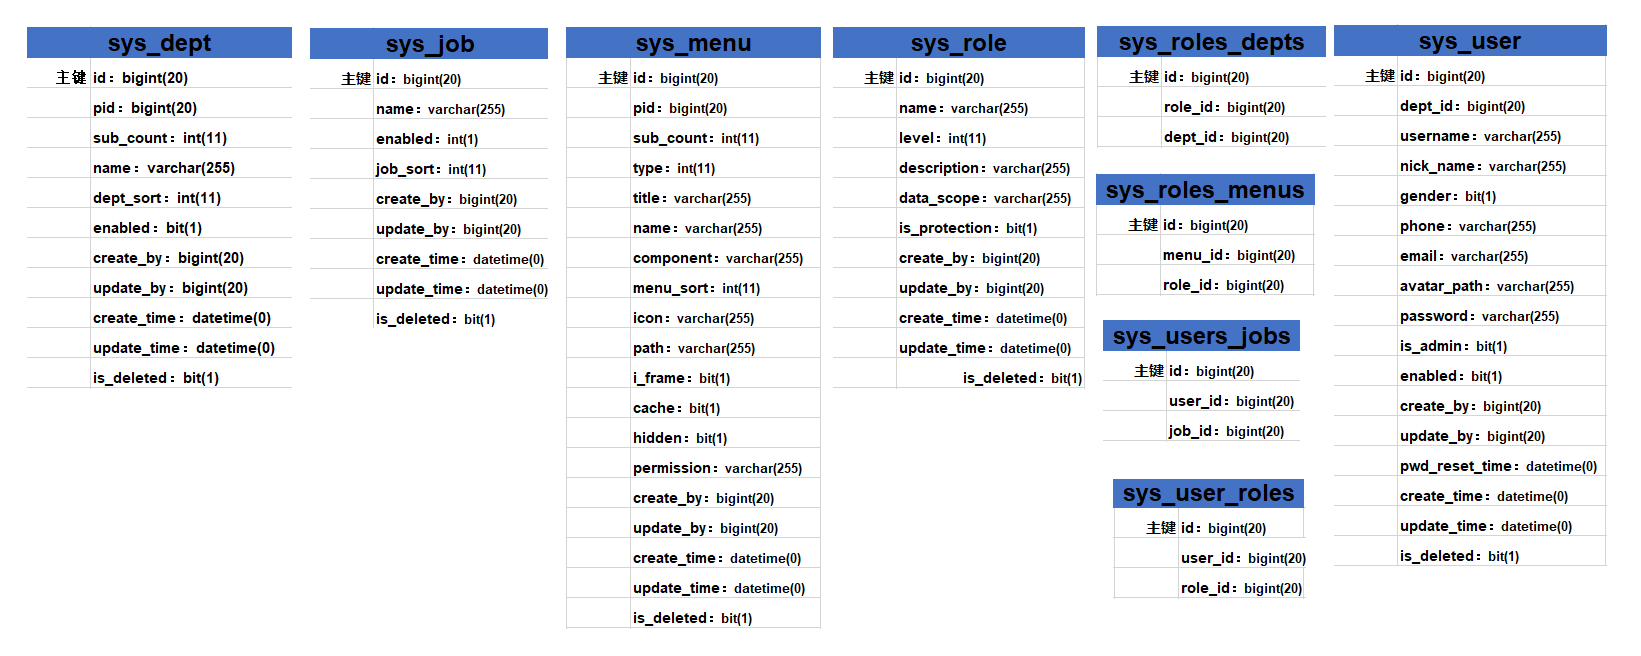
本系统安全框架使用的是 Spring Security + Jwt Token, 访问后端接口需在请求头中携带 token进行访问
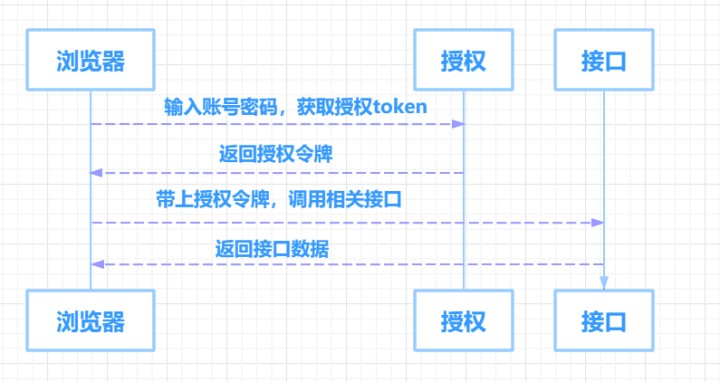
# 数据交互
用户登录 -> 后端验证登录返回 token-> 前端带上token请求后端数据 -> 后端返回数据, 数据交互流程如下:
# 权限方法及注解
在SpringSecurity安全框架中,提供了一些方法和注解来帮助我们进行权限判断和数据过滤
| 表达式 | 描述 |
|---|---|
| hasRole(String role) | 当前用户是否拥有指定角色。如果用户具备给定角色就则返回true,否则出现403 |
| hasAnyRole(String... roles) | 多个角色是一个以逗号进行分隔的字符串。如果当前用户拥有指定角色中的任意一个则返回true。 |
| hasAuthority(String authority) | 如果当前的主体具有指定的权限,则返回 true,否则返回 false 。适用于单个角色,不适用于多个角色权限 |
| hasAnyAuthority(String... authorities) | 如果当前的主体有任何提供的角色(给定的作为一个逗号分隔的字符串列表)的话,返回 true。适用于多个角色权限 |
| @Secured | 判断是否具有角色,另外需要注意这里匹配的字符串需要加前缀"ROLE_" |
| @PreAuthorize | 注解适合进入方法前的权限验证,可以将登录用户的roles/permissions参数传到方法中。方法执行之前校验 |
| @PostAuthorize | 使用并不多,在方法执行后再进行权限验证,适合验证带有返回值的权限 |
| @PostFilter | 对返回的数据进行过滤 |
| @PreFilter | 对传入的数据进行过滤 |
下面的接口表示用户拥有user:del权限就能能访问delete方法, 如果方法不加@preAuthorize注解,意味着所有用户都需要带上有效的token 后才能访问delete
 @ApiOperation("删除用户")
    @DeleteMapping
    @PreAuthorize("@smpe.check('user:del')")
    @Transactional(rollbackFor = Exception.class)
    public Result<Void> delete(@RequestBody Set<Long> ids) {
        for (Long id : ids) {
            if (!checkLevel(id)) {
                log.error("【删除用户失败】角色权限不足,不能删除。" + "操作人id:" + SecurityUtils.getCurrentUserId() + "。预删除用户id:" + id);
                throw new BadRequestException("角色权限不足,不能删除:" + userService.getById(id).getUsername());
            }
        }
        boolean isDel = userService.removeByIds(ids);
        if (! isDel) {
            log.error("【删除用户失败】角色权限不足,不能删除。" + "操作人id:" + SecurityUtils.getCurrentUserId() + "。预删除用户id集合:" + ids);
            throw new BadRequestException("【删除用户失败】" + "操作人id:" + SecurityUtils.getCurrentUserId());
        }
        return Result.success();
    }
2
3
4
5
6
7
8
9
10
11
12
13
14
15
16
17
18
check() 方法表示如果该身份是admin的话,直接返回true,不再进行多余判断。如果不是admin的话,将用户的所有身份进行判断,看是否有匹配的身份,若有返会true,无则返回false
@Service(value="smpe")
publicclassPermissionConfig {
publicBooleancheck(String... permissions) {
// 获取当前用户的所有权限
List<String>smpePermissions=
SecurityUtils.getCurrentUser().getAuthorities().stream().map(GrantedAuthority::getAuthority).collect(Collectors.toList());
// 判断当前用户的所有权限是否包含接口上定义的权限
returnsmpePermissions.contains("admin") ||Arrays.stream(permissions).anyMatch(smpePermissions::contains);
    }
}
2
3
4
5
6
7
8
9
10
使用方式:
@PreAuthorize("@smpe.check('user:del')")
# 接口放行
在我们使用的时候,有些接口是不需要验证权限的,这个时候就需要我们给接口放行,使用方式如下:
1、使用注解方式
只需要在Controller的方法上加入该注解即可@AnonymousAccess
2、修改配置文件方式
smpe-system -> modules -> security -> config -> SecurityConfig
使用 permitAll()方法所有人都能访问,包括带上 token访问使用 anonymous()所有人都能访问,但是带上 token访问后会报错
// 关键代码,部分略
protectedvoidconfigure(HttpSecurityhttpSecurity) throwsException {
// 搜寻匿名标记 url: @AnonymousAccess
Map<RequestMappingInfo, HandlerMethod>handlerMethodMap=
applicationContext.getBean(RequestMappingHandlerMapping.class).getHandlerMethods();
// 获取匿名标记
Map<String, Set<String>>anonymousUrls=getAnonymousUrl(handlerMethodMap);
log.info("放行的接口(匿名访问)"+anonymousUrls);
httpSecurity
// 自定义匿名访问所有url放行:允许匿名和带Token访问,细腻化到每个 Request 类型
        // 放行OPTIONS请求
                .antMatchers(HttpMethod.OPTIONS, "/**").permitAll()
// GET
                .antMatchers(HttpMethod.GET,
anonymousUrls.get(RequestMethodEnum.GET.getType()).toArray(newString[0])).permitAll()
// POST
                .antMatchers(HttpMethod.POST,
anonymousUrls.get(RequestMethodEnum.POST.getType()).toArray(newString[0])).permitAll()
// PUT
                .antMatchers(HttpMethod.PUT,
anonymousUrls.get(RequestMethodEnum.PUT.getType()).toArray(newString[0])).permitAll()
// PATCH
                .antMatchers(HttpMethod.PATCH,
anonymousUrls.get(RequestMethodEnum.PATCH.getType()).toArray(newString[0])).permitAll()
// DELETE
                .antMatchers(HttpMethod.DELETE,
anonymousUrls.get(RequestMethodEnum.DELETE.getType()).toArray(newString[0])).permitAll()
// 所有类型的接口都放行
                .antMatchers(anonymousUrls.get(RequestMethodEnum.ALL.getType()).toArray(newString[0])).permitAll()
// 所有请求都需要认证
                .anyRequest().authenticated()
                .and().apply(securityConfigurerAdapter());
}
2
3
4
5
6
7
8
9
10
11
12
13
14
15
16
17
18
19
20
21
22
23
24
25
26
27
28
29
30
31
32
33
# 越权处理
下面的if (! checkLevel(id))判断条件表示如果当前用户的权限级别 > 被删除的用户权限级别,则向下执行,若当前用户的权限级别 <= 被删除的用户,则抛出异常。
@ApiOperation("删除用户")
@DeleteMapping
@PreAuthorize("@smpe.check('user:del')")
@Transactional(rollbackFor=Exception.class)
publicResult<Void>delete(@RequestBodySet<Long>ids) {
for (Longid : ids) {
if (!checkLevel(id)) { // 通过checkLevel()方法判断当前用户是否越权,并返回对应的信息。
log.error("【删除用户失败】角色权限不足,不能删除。"+"操作人id:"+SecurityUtils.getCurrentUserId() +"。预删除用户id:"+id);
thrownewBadRequestException("角色权限不足,不能删除:"+userService.getById(id).getUsername());
        }
    }
booleanisDel=userService.removeByIds(ids);
if (!isDel) {
log.error("【删除用户失败】角色权限不足,不能删除。"+"操作人id:"+SecurityUtils.getCurrentUserId() +"。预删除用户id集合:"+ids);
thrownewBadRequestException("【删除用户失败】"+"操作人id:"+SecurityUtils.getCurrentUserId());
    }
returnResult.success();
}
2
3
4
5
6
7
8
9
10
11
12
13
14
15
16
17
18
源码
通过checkLevel()方法处理越权行为
/**
* description:操作多个角色时,判断用户权限(通过role的level)
* @param roleIds 预操作角色的id集合
* @return true 有权限
*/
privatebooleancheckLevel(Set<Long>roleIds) {
IntegercurrentLevel=Collections.min(roleService.findRoleByUserId(SecurityUtils
                .getCurrentUserId()).stream().map(RoleSmallDTO::getLevel).collect(Collectors.toList()));
IntegeroptLevel=roleService.findRoleMinLeave(roleIds);
//level 越小权限越大
returncurrentLevel<=optLevel;
    }

/**
* description:操作用户时,判断用户权限
* @param userId 预操作用户id
* @return true 有权限
*/
privatebooleancheckLevel(LonguserId) {
IntegercurrentLevel=
Collections.min(roleService.findRoleByUserId(SecurityUtils.getCurrentUserId()).stream().map
                        (RoleSmallDTO::getLevel).collect(Collectors.toList()));
IntegeroptLevel=
Collections.min(roleService.findRoleByUserId(userId).stream().map(RoleSmallDTO::getLevel).collect
                        (Collectors.toList()));
//level 越小权限越大
returncurrentLevel<=optLevel;
    }
2
3
4
5
6
7
8
9
10
11
12
13
14
15
16
17
18
19
20
21
22
23
24
25
26
27
28
# 系统缓存
本系统缓存运用springboot切面编程的思想与java反射原理开发了新的注解@Query与@Queries,通过新注解@Query与@Queries实现了原先@One和@Many的效果,
# 单一实体缓存,key和value都仅与该实体相关(1:1)
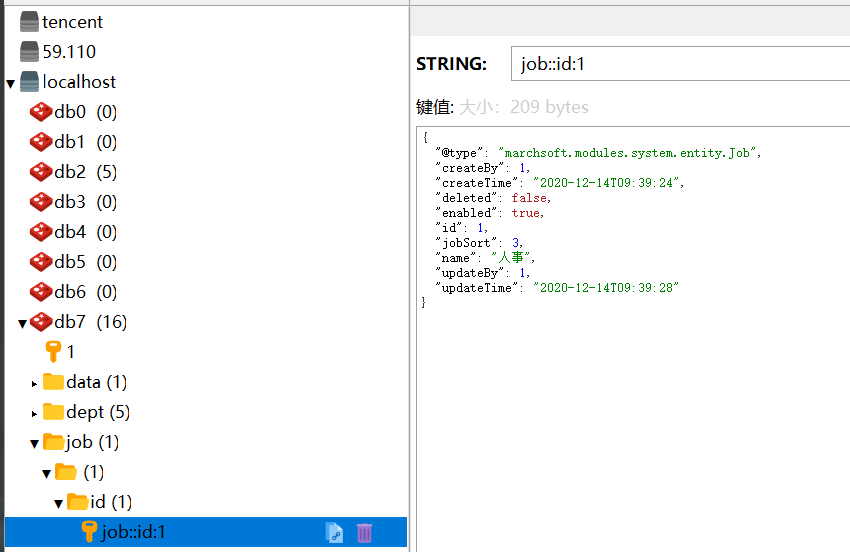
首先是针对一个实体的单条信息进行缓存,key和value都和一个实体有关。如缓存job表的每一条记录,以id和键名,Job实体为value存入缓存:
在JobMapper加上命名空间 @CacheConfig(cacheNames = "job")1首先在JobMapper加上命名空间:
@CacheConfig(cacheNames = "job")
public interface JobMapper extends BasicMapper<Job> {
2
虽然
BaseMapper已经提供了根据id查询——T selectById(Serializable id);重写selectById,并加上@Cacheable
但是咱们需要加上缓存,所以需要重新在
mapper层写该方法(无需写sql),并加上@Cacheable,此时键名key的命名规则为统一的"'id:' + #p0",id指Job的id,#p0指方法的第一个参数:
@Cacheable(key = "'id:' + #p0")
Job selectById(Long id);
2
此时
springboot会将第一查询的结果放入缓存,之后无论是从service调mapper的该方法,还是从mapper的@Query中调用该方法都可以走缓存。缓存情况如下图:
将键名除id外以静态变量存入CacheKey
可以看到我们成功把id为1的job存入了
redis缓存,该缓存的value即为Job实体类,键名为 job:🆔1 ,其中为了后期维护缓存方便,我们将字符串 "job:🆔" 作为静态变量存入CacheKey.class中,在做维护时只需拼接一个id即可:
public interface CacheKey {
    /**
     * 用户
     */
    String USER_ID = "user::id:";
    /**
     * 数据
     */
    String DATA_USER = "data::user:";
    /**
     * 菜单
     */
    String MENU_ID = "menu::id:";
    String MENU_USER = "menu::user:";
    String MENU_ROLE = "menu::role:";
    /**
     * 角色授权
     */
    String ROLE_AUTH = "role::auth:";
    String ROLE_USER = "role::user:";
    /**
     * 角色信息
     */
    String ROLE_ID = "role::id:";
    /**
     * 部门信息
     */
    String DEPT_ID = "dept::id:";
    String DEPT_ROLE = "dept::role:";
    /**
     * 岗位信息
     */
    String JOB_ID = "job::id:";      //示例
    String JOB_USER = "job::user:";
}
2
3
4
5
6
7
8
9
10
11
12
13
14
15
16
17
18
19
20
21
22
23
24
25
26
27
28
29
30
31
32
33
34
35
在对应的service层手动维护缓存
- 这里为了统一建议手动维护缓存,即在
JobServiceImpl下手写一个方法来清理缓存,在相应的更新、删除Job的地方调用该方法即可:
    /**
     * 清理缓存
     * @param id job_id
     */
private void delCaches(Long id){
    redisUtils.del(CacheKey.JOB_ID + id);
}
2
3
4
5
6
7
- 你也可以在相应的更新、删除的方法上加上springboot删除缓存的注解(不推荐,后期缓存情况复杂)
@CacheEvict(key = "'id:' + #p0.id")
public void update(Job resources) {}
2
对于单一实体的缓存,仅缓存 selectById方法,对于该实体的分页查询等其他条件查询一般不做缓存,除非有特殊要求
# 缓存内容关联两个及以上的实体(1:n,n:m)
@Query中所调用的方法必须要有缓存,这里user与job是多对多的关系,有一张中间sys_users_jobs,当我们在查询一个用户时要连带将其所有的岗位也查找出来:
//UserMapper中查询一个用户
@Select("SELECT id,dept_id,username,nick_name,gender,phone,email,avatar_path,password," +
            "is_admin,enabled,create_by,update_by,pwd_reset_time,create_time,update_time" +
            " FROM sys_user u WHERE u.id = #{id} AND is_deleted=0")
    @Results({
            @Result(column = "id", property = "id"),
            @Result(column = "dept_id", property = "deptId"),
    })
    @Queries({
            @Query(column = "id", property = "roles",
                    select = "marchsoft.modules.system.mapper.RoleMapper.findWithMenuByUserId"),
            @Query(column = "id", property = "jobs",
                    select = "marchsoft.modules.system.mapper.JobMapper.findByUserId"),  //这里
            @Query(column = "dept_id", property = "dept",
                    select = "marchsoft.modules.system.mapper.DeptMapper.selectById")
    })
    @Cacheable(key = "'id:' + #p0")
    UserBO findUserDetailById(Long id);
2
3
4
5
6
7
8
9
10
11
12
13
14
15
16
17
18
- 既然通过
@Query调用了JobMapper.findByUserId方法,我们就需要对其加缓存(其他的同理)
//JobMapper中根据用户id查询岗位
@Select("SELECT j.id, j.name, j.enabled, j.job_sort, j.create_by, j.update_by, j.create_time, j.update_time " +
            "FROM sys_job j, sys_users_jobs uj WHERE j.id = uj.job_id AND uj.user_id = ${id} AND j.is_deleted=0")
@Cacheable(key = "'user:' + #p0")
Set<Job> findByUserId(Long id);
2
3
4
5
此时缓存的命名规则为 key = "'user:' + #p0" ,这里的user指user_id的意思,后面的参数#p0就是user_id,我们可以发现此时的redis里缓存全称为:
job::user:2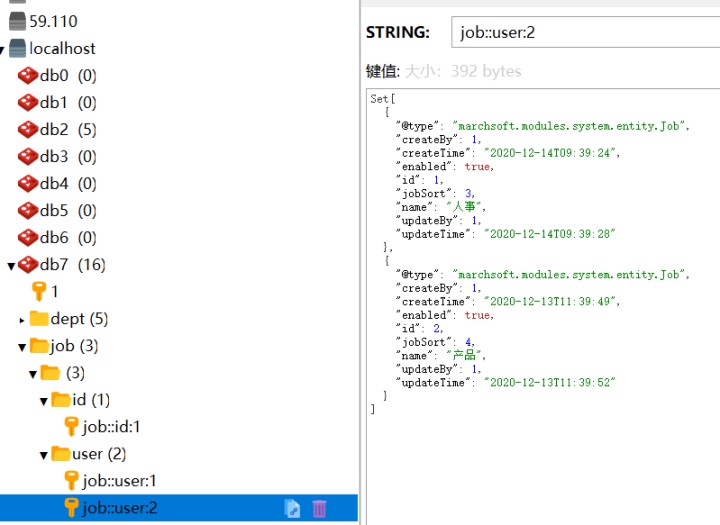
意思即为user_id为2的用户所拥有的job,从value中可以看出该用户有两个job。我们也需要将 "job::user:" 存入 CacheKey中,命名为 JOB_USER (可以回看上面的)。
从每个与该缓存相关的实体的service层对其进行维护
以 job::user:2 缓存维护为例
Job发生删改时,可能需要对改缓存进行维护
当我们修改了一个id为1的job,可能id为2的user有这个job,也可能没有,有的话必须删除该缓存,即我们需要通过sys_users_jobs关系表找到含有job_id=2的user_id的集合,是一个List:
//UserMapper下
//根据job_id查询用户Id (清理job缓存时调用)
@Select("SELECT user_id FROM sys_users_jobs WHERE job_id = #{id} group by user_id")
List<Long> findByJobId(Long id);
2
3
4
注意,这里是因为job的变动导致需要清理该缓存,所以该部分清理缓存的代码写在 JobServiceImpl下的
delcache方法中://JobServiceImpl private void delCaches(Long id){ List<Long> userIds = userMapper.findByJobId(id); redisUtils.delByKeys(CacheKey.JOB_USER, new HashSet<>(userIds)); //第二种情况所删的缓存 redisUtils.del(CacheKey.JOB_ID + id); //第一种情况所删的缓存 }1
2
3
4
5
6当中间表sys_users_jobs发生变动时,一定要清理缓存!
当我们修改了user的job时,如上图user_id = 2的用户有两个job,我们将其调整为一个job,此时也需要删除 job::user:2 这条缓存,由于是因为更新了user才导致删除这条缓存,所以该部分代码写在
UserServiceImpl的更新、删除中://UserServiceImpl下的更新user方法 public void updateUserWithDetail(UserInsertOrUpdateDTO userInsertOrUpdateDTO) { //... //如果岗位发生变化 if (! CollectionUtils.isEqualCollection(jobIds, userInsertOrUpdateDTO.getJobs())) { //... //清除缓存 redisUtils.del(CacheKey.JOB_USER + userInsertOrUpdateDTO.getId()); } //... }1
2
3
4
5
6
7
8
9
10
11这样,我们才算是对 job::user:2这条缓存做了完全的维护。
对于情况一的缓存只涉及一个实体(表),缓存维护比较好实现,针对第二种情况需要我们考虑全面,在哪些地方需要去维护,这个需要考虑清除,不要随意加缓存
# 异常处理
我们开发项目时,数据在请求过程中发生错误是避免不了的,我们需要捕获这些异常信息,做统一的异常处理。
如:登陆失败,权限不足,数据为空,请求失败等。这些异常如果不经过处理,会对前端小伙伴造成非常大的困扰。
做统一的异常返回,是项目中必不可少的一个模块。
# 自定义异常
通用异常
封装了BadRequestException作为通用的异常处理
@Getter
public class BadRequestException extends RuntimeException {

private Integer status = BAD_REQUEST.value();

public BadRequestException(String msg) {
super(msg);
    }

public BadRequestException(Integer status, String msg) {
super(msg);
this.status = status;
    }

public BadRequestException(ResultEnum resultEnum) {
super(resultEnum.getMsg());
this.status = resultEnum.getCode();
    }

}
2
3
4
5
6
7
8
9
10
11
12
13
14
15
16
17
18
19
20
处理自定义异常(在全局异常处理中:src/main/java/marchsoft/exception/handler/GlobalExceptionHandler.java)
/**
* 功能描述:处理自定义异常
*
* @param e 自定义异常
* @return restful风格的异常信息
* @author RenShiWei
* Date: 2020/4/13 22:18
*/
@ExceptionHandler(value = BadRequestException.class)
public ResponseEntity<Result<String>> badRequestException(BadRequestException e) {
log.error(e.getMessage(), e);
//默认到后端的请求,状态码都为200,自定义的异常由封装的code去控制
return ResponseEntity.status(HttpStatus.OK).body(Result.error(e.getMessage()));
}
2
3
4
5
6
7
8
9
10
11
12
13
14
其他异常的处理
权限不足异常
/**
* description: security的角色权限不足异常
*
* @param e 权限不足异常
* @return 200状态码 403自定义code
* @author RenShiWei
* Date: 2020/8/7 19:52
*/
@ExceptionHandler(AccessDeniedException.class)
public ResponseEntity<Result<String>> handleAccessDeniedException(AccessDeniedException e) {
log.error(e.getMessage(), e);
return ResponseEntity.status(HttpStatus.FORBIDDEN).body(Result.error(ResultEnum.IDENTITY_NOT_POW.getCode(),
            ResultEnum.IDENTITY_NOT_POW.getMsg()));
}
2
3
4
5
6
7
8
9
10
11
12
13
14
不可知异常处理
/**
* 功能描述:处理所有不可知的异常
* @param e 异常 Throwable(异常的根类)
* @return 异常对象信息
* @author RenShiWei
* Date: 2020/7/10 10:54
*/
@ExceptionHandler(Throwable.class)
public ResponseEntity<Result<String>> handleException(Throwable e) {
// 打印堆栈信息
    log.error(e.getMessage(), e);
return ResponseEntity.status(HttpStatus.INTERNAL_SERVER_ERROR).body(Result.error(ResultEnum.SEVER_ERROR.getCode(), ResultEnum.SEVER_ERROR.getMsg()));
}
2
3
4
5
6
7
8
9
10
11
12
13
其他异常处理
详情请见:src/main/java/marchsoft/exception/handler/GlobalExceptionHandler.java
// 通用异常
throw new BadRequestException("发生了异常");
// 通用异常,使用自定义状态码
throw new BadRequestException(HttpStatus.OK, "发送了异常");
2
3
4
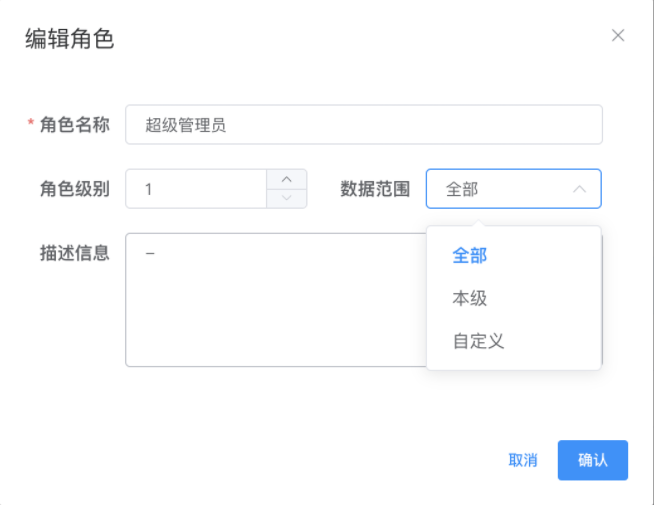
# 数据权限
本系统是基于部门做的一个简单数据权限控制,也就是通过用户角色中的数据权限控制用户能看哪些数据。
# 注解方式
现可通过注解@DataPermission 进行权限控制
# 数据权限
系统提供了三种数据权限控制
- 全部数据权限:无数据权限限制
- 本级数据权限:限制只能看到本部门数据
- 自定义数据权限:可根据实际需要选择部门控制数据权限
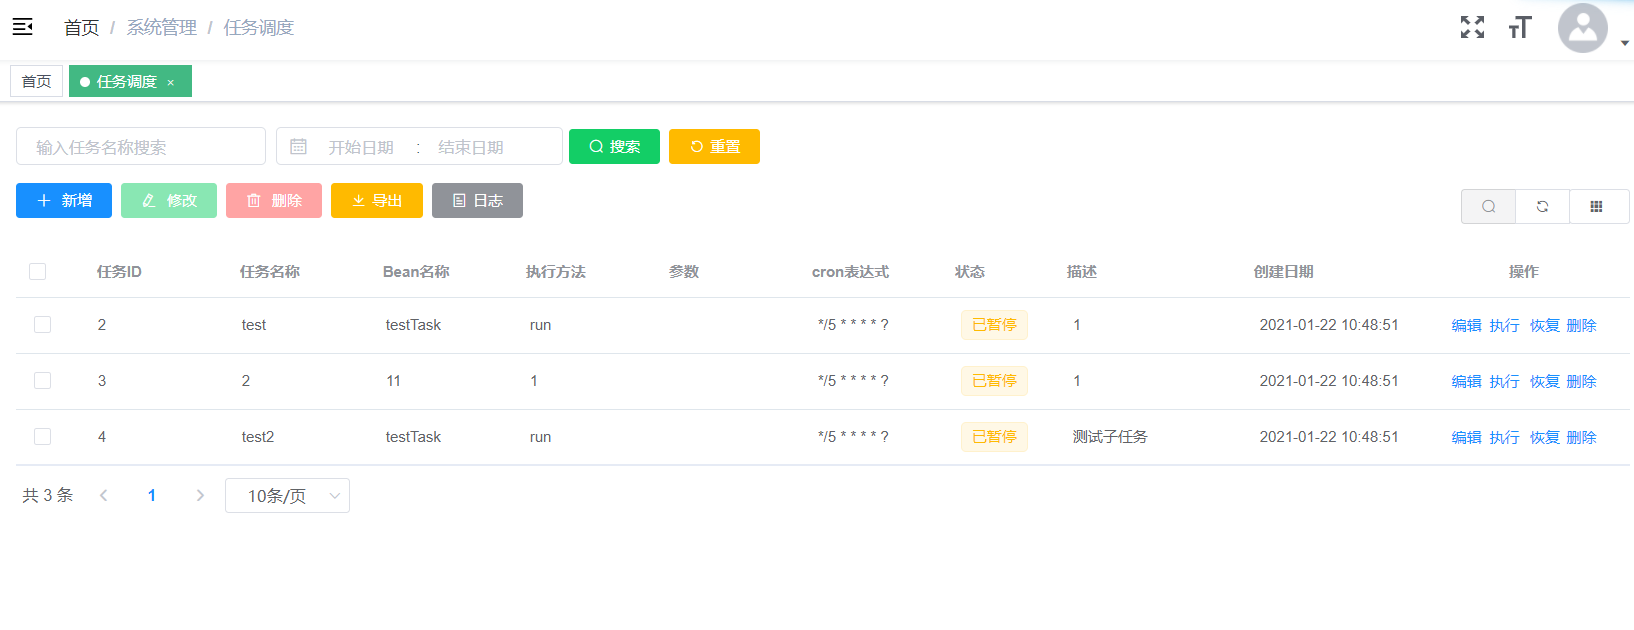
# 定时任务
框架对定时任务做了整合
对于简单的定时任务可以只使用spring 的@sechduled 注解
对于动态管理动态任务,涉及到定时任务的增删改,以及数据库持久化储存,本框架整合了quartz,可通过后台管理页面对定时任务进行增删改查操作,
并对定时任务进行了日志监控
本模块的源码在 smpe-system\src\main\java\marchsoft\modules\quartz
后台页面展示:
# 具体使用步骤:
- 新增定时任务
打开定时任务调度界面,点击新增,填写具体参数
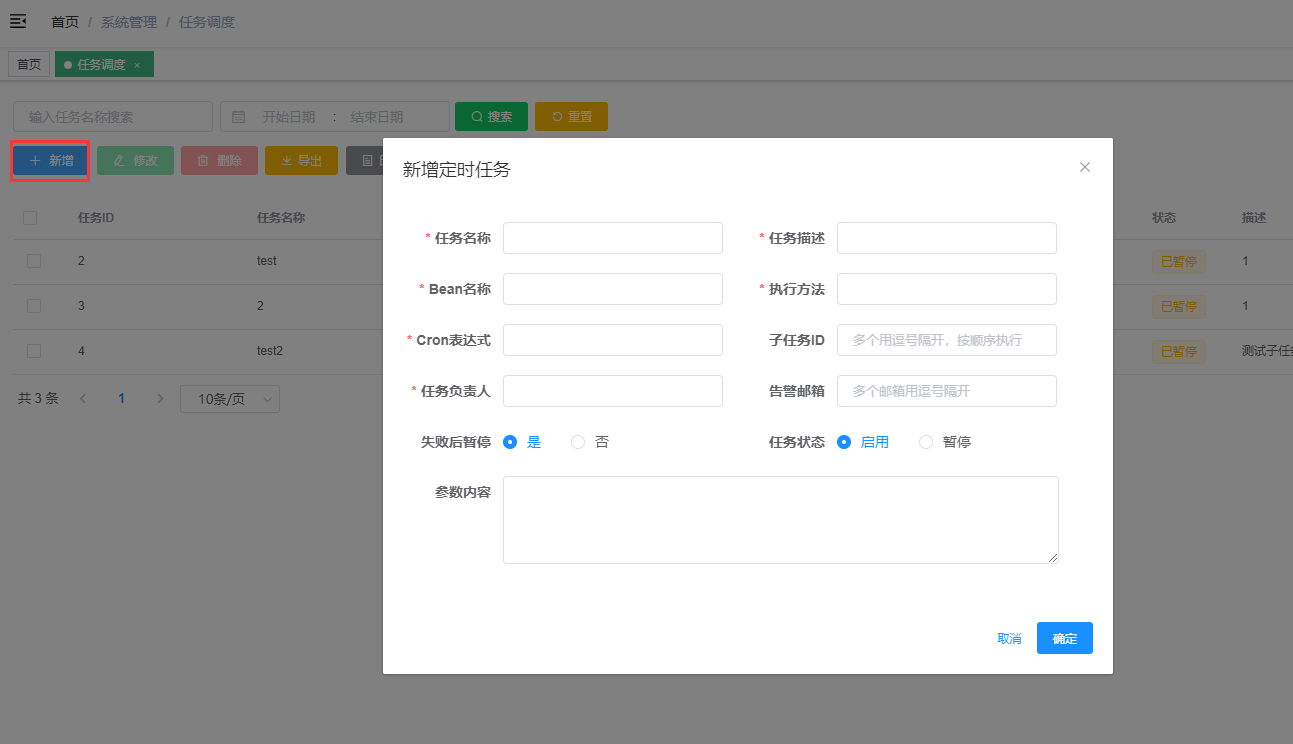
参数解释
- 任务名称:当前任务的名称,可以自定义
- 任务描述:对该任务的描述
bean名称: 定时任务通过bean名称来获取具体执行的bean对象。需要执行的定时任务类,必须注入spring容器中。- 执行方法: 需要执行的方法名称,底层是通过反射执行方法。
cron表达式:定时任务通过cron表达式控制任务执行的时间,具体内容可以查询官方cron表达式介绍- 子任务
id:子任务可以是当前已经定义过的任务的id,传入时需要用多个逗号隔开,当主任务执行后,子任务后按顺序依次执行。 - 任务负责人:该任务的负责人
- 告警邮箱:定时任务执行失败时会将失败信息通过邮箱发送给用户。如果有多个邮箱可以用逗号隔开,如果不需要则不用填。(该功能暂不支持)
- 失败后暂停:选择定时任务失败后是否暂停当前定时任务。
- 任务状态:选择是否开启当前定时任务。
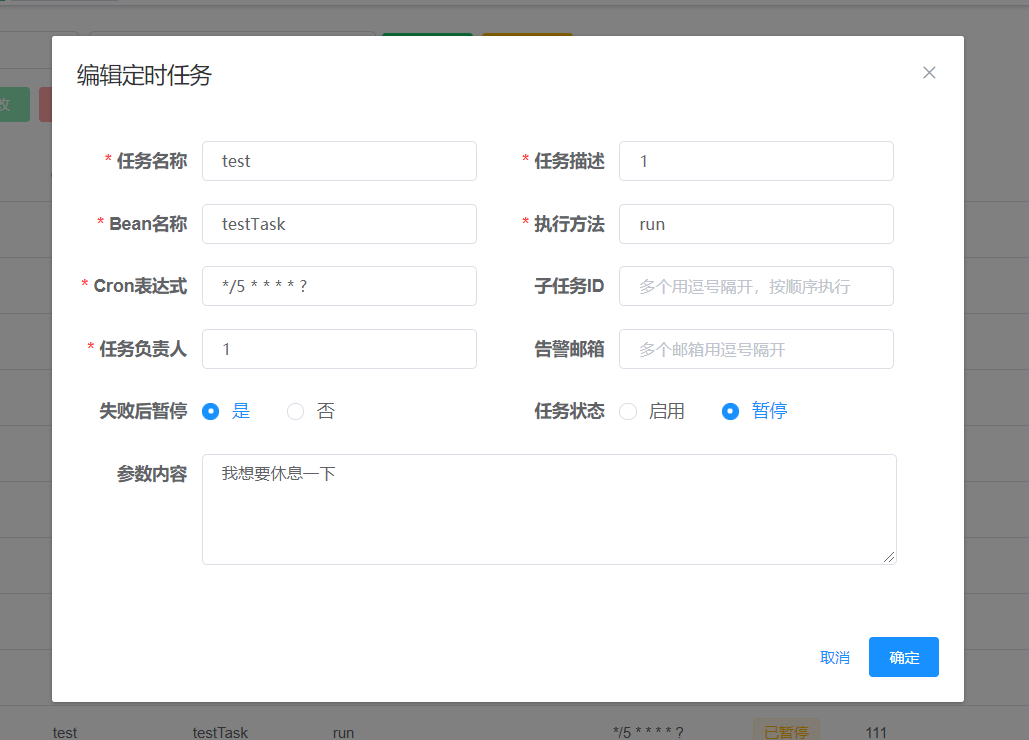
- 参数内容: 填写参数内容,可向后端传一个字符串参数,具体使用方法见下图
@Slf4j
@Component
public class TestTask {

    public void run1(String str){
        log.info("run1 执行成功,参数为:" + str);
    }
}
2
3
4
5
6
7
8

前端可以根据该参数向后端传需要执行的内容。
# 原理解释
本框架使用的是spring quartz框架,详细解释可以参考博客'原理' (opens new window)
关于quartz框架的持久化操作,详情可以看本模块的源码 smpe-system\src\main\java\marchsoft\modules\quartz
# 异步线程池
代码地址:smpe-common\src\main\java\marchsoft\config\bean\AsyncTaskProperties.java
源码如下:
/**
 * description:异步任务线程池装配类
 *
 * @author RenShiWei
 * Date: 2020/7/12 21:58
 * '@EnableAsync' 开启异步线程,
 * 重写AsyncConfigurer的方法:使用@Async标注方法执行异步任务,每次都要添加注解,可以重写spring默认线程池的方式使用的时候,
 * 只需要加@Async注解就可以,不用去声明线程池类。
 */
@Slf4j
@Configuration
@EnableAsync
@RequiredArgsConstructor
public class AsyncTaskExecutePool implements AsyncConfigurer {

/** 注入配置类 */
    private final AsyncTaskProperties config;

/**
     * description: 设置线程池的参数配置
     *
     * @author RenShiWei
     * Date: 2020/8/11 15:44
     */
    @Override
    public Executor getAsyncExecutor() {
        ThreadPoolTaskExecutor executor = new ThreadPoolTaskExecutor();
// 核心线程池大小
        executor.setCorePoolSize(config.getCorePoolSize());
// 最大线程数
        executor.setMaxPoolSize(config.getMaxPoolSize());
// 队列容量
        executor.setQueueCapacity(config.getQueueCapacity());
// 活跃时间
        executor.setKeepAliveSeconds(config.getKeepAliveSeconds());
// 线程名字前缀
        executor.setThreadNamePrefix("smpe-async-");
// setRejectedExecutionHandler:当pool已经达到max size的时候,如何处理新任务
        // CallerRunsPolicy:不在新线程中执行任务,而是由调用者所在的线程来执行
        executor.setRejectedExecutionHandler(new ThreadPoolExecutor.CallerRunsPolicy());
        executor.initialize();
return executor;
    }

/**
     * description: 异步任务的异常处理
     *
     * @author RenShiWei
     * Date: 2020/8/11 15:40
     */
    @Override
    public AsyncUncaughtExceptionHandler getAsyncUncaughtExceptionHandler() {
        return (throwable, method, objects) -> {
            log.error("====" + throwable.getMessage() + "====", throwable);
            log.error("exception method:" + method.getName());
        };
    }

}
2
3
4
5
6
7
8
9
10
11
12
13
14
15
16
17
18
19
20
21
22
23
24
25
26
27
28
29
30
31
32
33
34
35
36
37
38
39
40
41
42
43
44
45
46
47
48
49
50
51
52
53
54
55
56
57
58
59
使用方式如下
使用@EnableAsync来开启异步的支持,使用@Async来对某个方法进行异步执行。
# 线程池工具
代码地址:smpe-common\src\main\java\marchsoft\utils\ThreadPoolExecutorUtil.java
源码如下:
/**
 * description: 自定义线程池工具类
 *
 * @author RenShiWei
 * Date: 2020/7/12 21:58
 */
public class ThreadPoolExecutorUtil {

public static ThreadPoolExecutor getPoll() {
        AsyncTaskProperties properties = SpringContextHolder.getBean(AsyncTaskProperties.class);
return new ThreadPoolExecutor(
                properties.getCorePoolSize(),
                properties.getMaxPoolSize(),
                properties.getKeepAliveSeconds(),
                TimeUnit.SECONDS,
new ArrayBlockingQueue<>(properties.getQueueCapacity()),
new TheadFactoryName());
    }
}
2
3
4
5
6
7
8
9
10
11
12
13
14
15
16
17
18
19
使用方式:
privatefinalstaticThreadPoolExecutor executor =ThreadPoolExecutorUtil.getPoll();
# 分页实现
自定义分页信息默认值,默认当前页是1,每页显示10条数据。
代码地址:smpe-common\src\main\java\marchsoft.base.PageVO
源码如下:
/**
     * 获取排序信息,排序的字段和正反序
     */
    @ApiModelProperty(value = "排序方式。(默认【创建时间倒序】:[{'column': 'create_time','asc': false}])。",
            notes = "例子:[{'column': 'create_time','asc': false},{'column':'name','asc': true}]"
    )
    private String orders;

    /**
     * 当前页默认值为1
     */
    public Integer getCurrent() {
        return current = (current == null || current <= 0) ? 1 : current;
    }

    /**
     * 每页大小默认为10
     */
    public Integer getSize() {
        return size = (size == null || size == 0) ? 10 : size;
    }

    /**
     * description:将orders(json数组字符串)转为List
     */
    public List<OrderItem> generateOrderList() {
        List<OrderItem> orderItemList = new ArrayList<>();
        if (StrUtil.isBlank(getOrders())) {
            orderItemList.add(OrderItem.desc("create_time"));
        } else {
            try {
                orderItemList = JSONArray.parseArray(orders, OrderItem.class);
            } catch (Exception e) {
                throw new BadRequestException("分页排序参数orders不合法,请传正确的参数格式——['column':'','asc':'true/false']");
            }
        }
        return orderItemList;
    }

    /**
     * description:根据pageVO构建分页查询IPage
     */
    public <K> IPage<K> buildPage() {
        Page<K> page = new Page<>(getCurrent(), getSize());
        page.addOrder(generateOrderList());
        return page;
    }
2
3
4
5
6
7
8
9
10
11
12
13
14
15
16
17
18
19
20
21
22
23
24
25
26
27
28
29
30
31
32
33
34
35
36
37
38
39
40
41
42
43
44
45
46
47
具体分页业务处理请参考项目 smpe-common\src\main\java\marchsoft.utils.PageUtil
# 自定义后端代码生成
关于代码生成类MyBatis-PlusGenerator的使用参考:自定义深度定制人性化的MyBatis-Plus的代码生成策略 (opens new window)
# 自定义扩展MyBatis-Plus
参考:如何深度定制扩展MyBatis-Plus提供的Model、Mapper、Service层的方法 (opens new window)